|

During the Second World War, all the output of Otto Berning and Co. (roughly 20,000 Robot II's) went to the German armed services. I think the only other camera manufacturer to supply the German military in the war years was Leitz. War-time Leicas are extremely valuable, while the far more interesting Robots are quite affordable. The camera featured on this page has an 'F' serial number, indicating it was made in the Second World War for the German military. The most common 'F' serial number camera variants are the classic black painted double-height spring models with black aluminium Tele-Zenars, made for the Luftwaffe. As you can see, mine has the standard silver-coloured top and bottom plates, and short wind knob, which adds to its rarity. The lens is an uncoated four element f/3.5 3.75cm Tessar from Carl Zeiss. 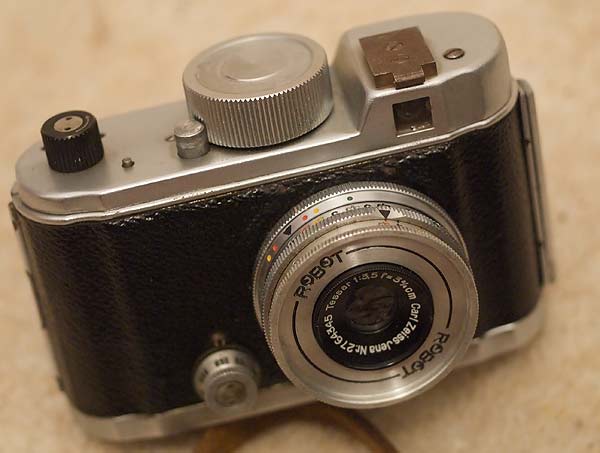 In 1943 the Berning and Co. factory was moved from Dusseldorf to Großschönau to avoid allied bombing, and workers included Dutch and Russian prisoners of war (Source: robot-camera.de). My lens dates from 1942 (according to the Zeiss serial number), so the camera could have been made by prisoners of war in 1943, which would fit with the simplified design- my camera has no right-angle viewfinder, no thread in the shutter release, and no flash synchronisation. Other differences from civilian Robot II's are the black manual wind-on knob, an acessory shoe that I've never seen on any other camera (that I think may have been for a special action finder), an ever-ready case which has no robot branding on it (also made out of paler coloured leather), the main wind knob has no arrow engraving to indicate the direction to wind, the top plate has no engravings at all, there is no safety lock for the shutter release, the rear door has no Robot branding, and the film gate is made of bakelite instead of zinc. The camera also came with a bakelite Robot lens cap, that I have never seen elsewhere- usually they are metal.  This camera was brought to the USA by an United States Air Force Lieutenant after the war. His name and address are written in the case, but aren't clear enough to read- I learnt from the seller that the Leutenant's name was Milton M. Silverstein. The seller, whose parents had been close friends with Milton, thought he could have been stationed in Germany either during the war, or immediately after it. From my research I have discovered that the owner of this camera was a navigator in a crew of a B-24H 'carpetbagger' (Source: Carpetbagger Photographic Archives).  A B-24H takes off from RAF Harrington.  Ju-88G night fighter When the aircraft arrived back in England, it was flying on three engines and had over 1,000 flak and cannon holes. Lt. Silverstein, along with other crew members, received the Distinguished Flying Cross for this action. I believe he completed his 35 missions with this crew, and left the theatre of operations. I can only speculate at what point he came to posess the camera- it is possible that he recieved it from a spy who obtained it in Germany while he was station ing the UK; but it is more likely that he was later stationed in Germany and picked it up there; or that he traded for it with another serviceman after the war.
The forgotten film. When I bought the camera in 2006, there was a film still in the camera from the 1950's. I opened the film cartridge and exposured the film to the light, but the emulsion had long since lost sensitivity. After processing, the film was very heavily fogged, but I was able to make out some images. It is amazing that the latent image, a hidden chemical record of photons hitting the emulsion, has survived for fifty years. The first two images to be recovered from this film can be seen below.
Recent photos from the Robot.  The Shuttleworth Collection's Westland Lysander IIIA Knowing the camera's history, it was great to be able to photograph this Lysander. This is the last air-worthy example of this type, and has been painted and fitted-out as a 'spy-taxi'. It is amazing to think that this camera may have been taken by Lt. Silverstein on similar missions.
 Sea Hurricane and Spitfire, Shuttleworth Collection
 Rose and Barbed Wire

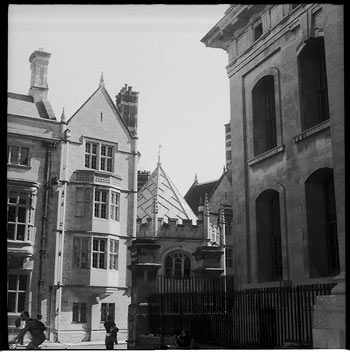 Oxford. 
|
|
Cleaning and Lubricating a Robot II. When my camera arrived from the US (it was an eBay purchase), the shutter was not completing the full cylce on the speeds slower than 1/25 sec, and the film drive would only rarely work at any speed (it had to be helped by pushing the spocket-drive with the back open, or gently turning the manual wind-on knob). It was unusuable in this condition, so a decided to have a go at the clean and lube myself (quotes for the repair by the only specialist in Robots (based in Germany) came to the same cost as I had paid for the camera- which was already double what I had bid on eBay once postage, VAT and customs clearance charges were added).
1. |
| 1. Removal of the manual wind-on knob and the associated drive blade for the take-up cassette is advisable before removing the bakelite film plane moulding (unlike in this photo!). The film plane is held in place by two metal plates held down by two screws each. Take care with the thin and brittle plastic when removing it. 2. The top plate comes off after two screws, the manual-wind on and main knobs are removed. The main knob on my model was simply removed by rotating it in the oposite direction to the winding direction. The film counter mechanism includes a sprung cog (that is under the button that unlinks the film drive from the counter so it can be reset). It is advisable to draw diagrams of how the parts are assembled at this point. I found double sided sticky tape to be useful for holding screws and cogs in place next to their locations on the diagrams. 3. The cover for the spring can be now be removed (take note- the four screws are not the same length). The spring barrel can be pulled up and out of the camera. 4. The metal pressing that is under the top plate is now removed, along with the screw holding in the film drive/shutter assembly in. Also the tube the manual wind-on runs in can be removed. 5. The main film drive/shutter assembly is now just held in by the shutter speed selector dial.
|
6.  7. 7. 8. 8. 9. 9. 10. 10.
|
| 6. Under the speed dial there is a four-pointed star-shaped spring providing tension on the dial, and a couple of washers on the front face fo the camera. 7. The main mechanism can be removed- the remaining chasis is quite light (when considering the total camera weight), considering it is a pressed steel structure with a double-thickness front for rigidity around the lens mount. 8. The next stages remove the capping blades and shutter disc to allow cleaning of the mechanism. The four screws to remove are on the front corners of the shutter assembly. Once the screws are released, all the shutter components are free, so keep the mechanism level, and be propared to remove and safely store the component from each level. 9. Removing the first sheet of black metal reveals the capping blades, these are directly linked to the movement of the shutter release, opening when it is depressed and closing as it returns so that the shutter can return to the cocked positon without exposing the film again. Note the four thick washers which space the sheets of metal so the capping shutters can move freely- these have to be carfefully positioned when re-assembiling. 10. This stage shows the upper capping blade and its arm linkage removed.
|
11. 12. 12. 13. 13. 14. 14. 15. 15.
|
| 11. This photo shows both capping blades removed, along with the two remaing linkages. 12. Removing the next layer of metal reveals the shutter disc and its three spacer sheets in the corners. Take great care not to bend the very thin vulcanite shutter, which would kink it and render the camera scrap. 13. After removal of the spacers. 14. After removal of the disc. 15. The final metal plate which protects the shutter disc from the oil of the pivots of the mechanism (plus gives a smooth surface for it to rotate against) is removed.
|
16. 17. 17. 18. 18. 19. 19. 20. 20.
|
| 16. The mechanism viewed from above. 17. The cam nearest the camera taking this photo is the shutter speed selector, engaging different timing gearings for the different speeds. 18. The gears for film movement can be seen in this shot. The gearing at the bottom regulates the speed of the spring so it doesn't tear the film. 19. The clock-work timing mechanism for slow speeds (1/10, 1/5, 1/2) is at the top in this shot. These pivots need light oiling with watch oil after cleaning, else the slow speeds won't run at all. 20. All the parts of the shutter laid out.
|
 To clean the mechanism, I soaked it for 15 minutes in a methylated spirit subsitute. I rinsed it in isopentane as the meths subsitute didn't evaorate very quickly, and not all of the dirt had been washed off some of the surfaces. After this had then evaporated, lubricated the pivots (using an opened paper clip) with specialist watch oil. Some pivots can be accessed from the shutter side, others need to be accessed from the sides. I found the long times would run after soaking in solvent, but when the mechanism was dry, it wouldn't complete the slow timings. After lubricating the slow speed mechanism (see 19), it ran, but it is still slow (1/2 sec is about 1 sec, 1/5 sec about 1/2 sec). As the Robot is an action sequence camera, I didn't worry too much about this, as everything will be taken hand-held at 1/50 or above. The film drive before cleaning wouldn't complete 9 times out of 10. After cleaning and lubricating, it has never not wound on, and sounds completely different. With the shutter speed set to 1/100 or higher, you can fire 2 or even 3 shots per second. I have heard people mention it is capable of 4 or 5 per second, but this is not possible (at least with this short wind knob model- the tall double-spring models may be faster as the spring is more powerful). I have also heard that the spring fires less shots before winding if set to 1/500. This is also not true, my spring holds enough for 18 frames, no matter what the shutter speed is set to.
|


